
HOW TO KNIT: THE BASICS
I’ve been knitting on and off for about 30 years. It was so long ago I can’t even remember how I learned. I do have vague memories of attempting to knit a scarf alongside my mother when I was around 10. As a young adult, my main passion was sewing, but as I got older, I found knitting to become increasingly more therapeutic for anxiety and stress. There was no research on the benefits to knitting when I started.
Today, there are all kinds of research studies popping up showing the positive effects that knitting and other crafts can have on mental and physical health. Knitting is a powerful tool. The rhythm helps release serotonin, the chemical responsible for regulating anxiety, happiness and mood. It also helps with mindfulness as it forces you to focus on the present. The relaxation experienced while knitting (once you get the hang of it!) allows you to focus on breathing, clearing your thoughts and just being still (minus your busy hands of course!). It really is amazing the host of benefits knitting offers. If you would like to learn more about the benefits of knitting, I recommend this article.
So I am super excited to have you here for Day One of the Get Crafty Challenge! Today, we are going to gather supplies and learn how to cast on stitches to start our project.
Knitting may or may not be for you, so we are going to start with something super simple – a scarf. I don’t want you to get frustrated, so we are going to stick with two simple stitches. If you feel you have mastered these and really enjoyed your knitting experience, I will provide more resources for you to explore on your own.
What you will need:
Yarn. Thicker yarn is better for when you are learning (just don’t go too thick). I would go for something in the 4 or 5 weight class. Almost all yarn labels have a weight classification on the label. Depending on the length you want your scarf, I would recommend approx. 400-500 yards.
Knitting Needles. For this project, just get a pair of straight needles in the size specified on your yarn label. See below.
Scissors. Any scissors will do.
TIME REQUIRED: Give your self at least half an hour to work on this
STEP ONE: Gather your supplies
Get your yarn and needles ready. (You won’t need your scissors until you are finished your project).

When selecting your yarn, be sure to check out the label, see below:


Yarn labels are pretty standard and carry much of the same information. They should tell you:
DYE LOT: Yarn is dyed in batches. If you are working on a project that requires multiple skeins of yarn, try to get them all from the same batch as there could be variations. In this case, there is no dye lot, so does not matter
CONTENTS OF YARN: My yarn is 100% acrylic. Acrylic is a very affordable yarn. Wool, cotton, merino and polyester are also popular
NET WEIGHT: This tells you how much yarn is in the skein. It should show length and weight as well. Patterns will always tell you how much yarn you need for the project
In the circle on the right are some boxes. These tell you:
YARN CLASS: This is a 6, which is bulky. For starting out, I would recommend a 4 (worsted) or a 5 (also bulky).
GAUGE MEASUREMENTS: When using patterns, you should always do a swatch to test your gauge. This is a practice round to make sure that the number of stitches specified fit into the swatch size, often 4″x4″ and will ensure that your project will turn out with similar measurements as the pattern was written for. This will give you the measurements (in inches, cm, rows and stiches that should fit in the total swatch size with the needle size suggested. The first one is for knitting and the second for crochet.
CARE INSTRUCTIONS: These tell you how to care for your finished piece. They match the standard care labels for garments. The care instructions are also laid out in the text below these boxes.
STEP TWO: Make a slip knot

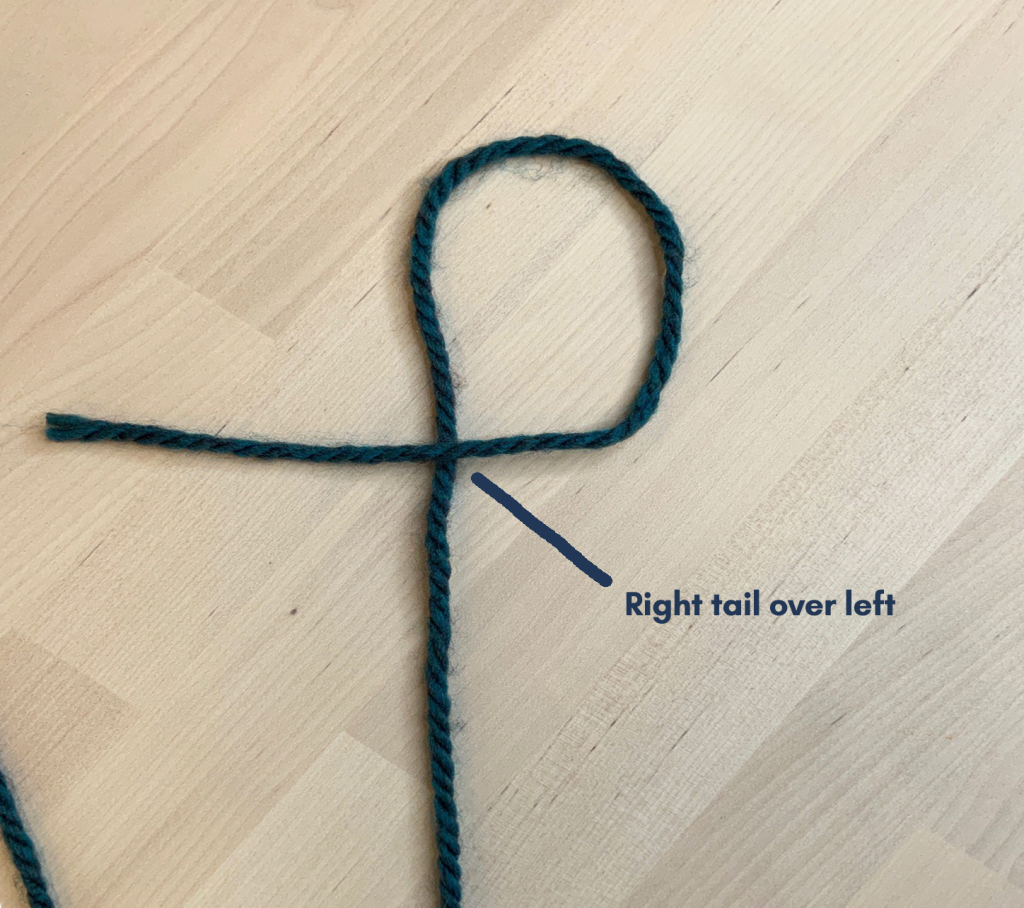
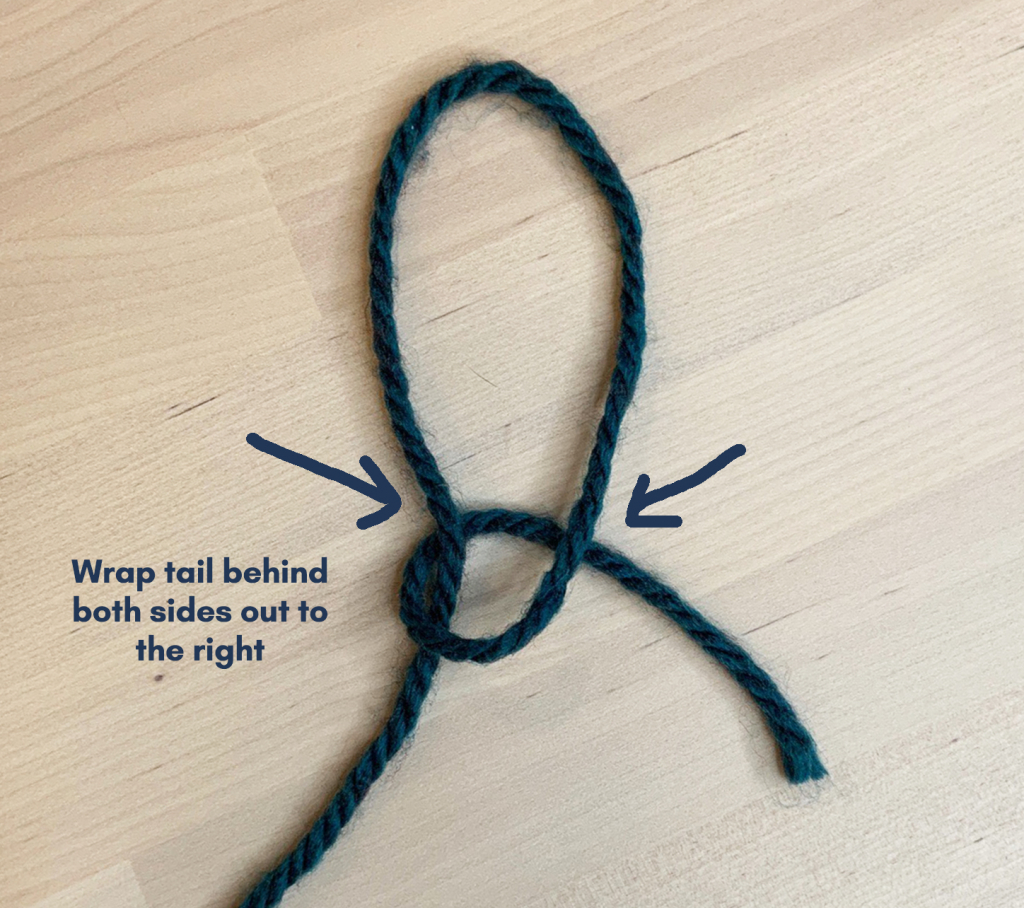

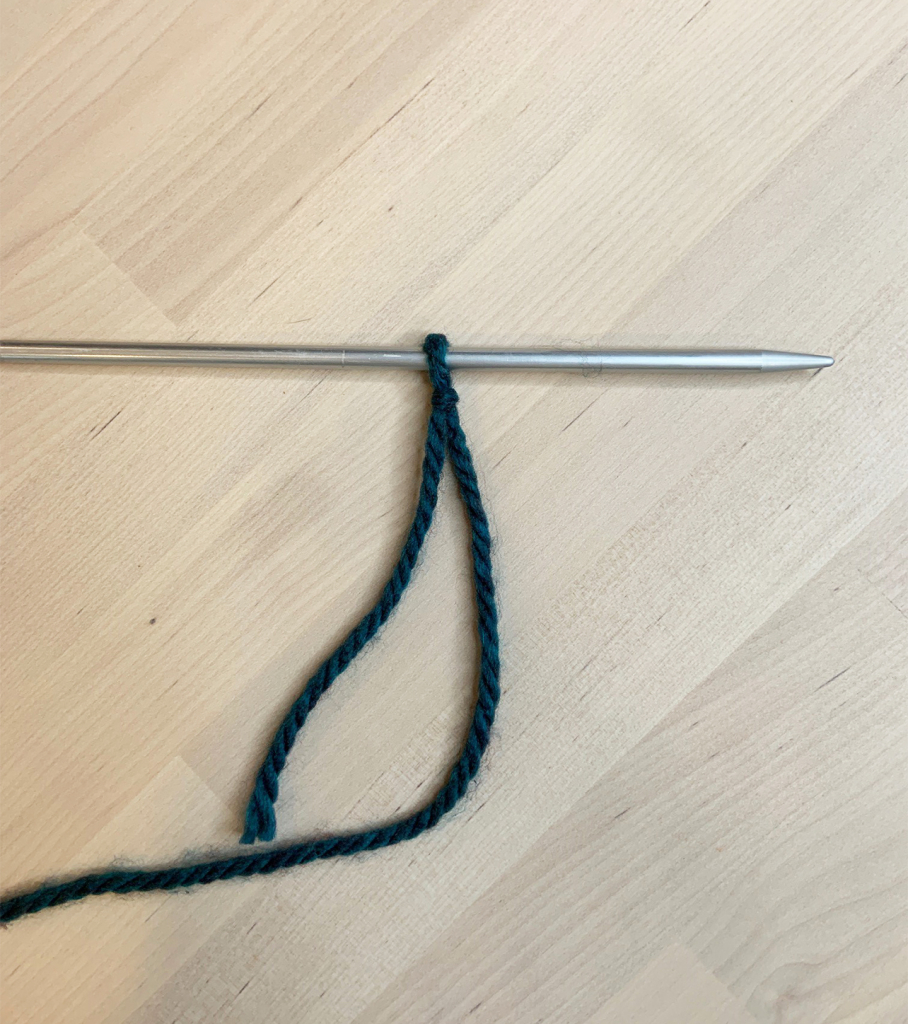
[If you are left handed, the needle instructions will reverse. right=left, left=right.]
STEP THREE: HOW TO CAST ON
(Right handed instructions!) To cast on, hold your second needle in your right hand and the needle with your slip knot in your left hand. Insert the needle in your right hand through your slip knot from front to back. Then wrap your yarn (attached to your ball) around the needle in your right hand (with your right hand). Slowly slide your right hand needle out of the loop, carrying your wrapped around yarn through the slip knot. Pull this yarn through and then slide it on to the left hand needle. You will have two stitches sitting on the left hand needle.
Click here for a video tutorial, done by We Are Knitters.
STEP FOUR: HOW TO KNIT THE KNIT STITCH
Before we start, make sure that your cast on stitches are facing you with the short tail on the left hand side. To start knitting, you will insert your right needle into the first cast on stitch on your left needle. Then, similar to casting on, wrap the yarn around your right needle and slide your right needle through the cast on loop, making sure to bring through the yarn you wrapped around through as well. Leave the stitch on the right needle. Tighten your yarn gently and this is your first knit stitch! Continue to follow these instructions until you’ve knit all of the cast on stitches on your left needle.
Click here for a video tutorial, by We Are Knitters.
When you have finished your first knit row, flip your project over and knit your next row. The steps are the exact same as what you have just completed. Continuous knitted rows are called the Garter Stitch!
Below is an image of what some beginner stitch patterns look like.

- Stockinette Stitch: common in garments. Produces on flat side (front) and one bumpy side (back). We will learn more about this tomorrow.
- Garter Stitch: versatile and can be used in any project
- Ribbing Stitch: This is used for cuffs and hems of apparel. This stitch stretches and is usually knit with a smaller gauge needle than the rest of your piece to allow it to hug the body better. We won’t be covering this in these tutorials, but tomorrow I will provide more links if you wish to explore your knitting journey further!
Tomorrow, we are going to learn how to pearl and how to finish your project!
-e


2 Comments
Leave a Reply