This is Part Two of Two on How to Crochet. For Part One, click here.
Gardening is a great hobby to increase happiness. But it’s a lot of work keeping plants alive. Today you are going to use the stitches you learned yesterday and crochet a succulent. Because they are easier to care for than actual plants! Hopefully you had a chance to practice the stitches from yesterday. If not, you can refer back.
What you will need:
Yarn and crochet hook from yesterday
Scissors
Yarn Needle: this is different from a regular needle as the eye is a lot larger so the yarn will fit in
TIME REQUIRED: about half an hour
There are lots of patterns out there to make your own succulents. I have included a link below to a video tutorial done by a fellow crafter, Sewrella. It goes fairly quickly, so I am going to break it down into steps in writing for you to follow along. If you are a visual learner, I encourage you to watch the video a few times before you start though and pause as needed – things always make more sense when you can see them!
See the full tutorial video here by Sewrella
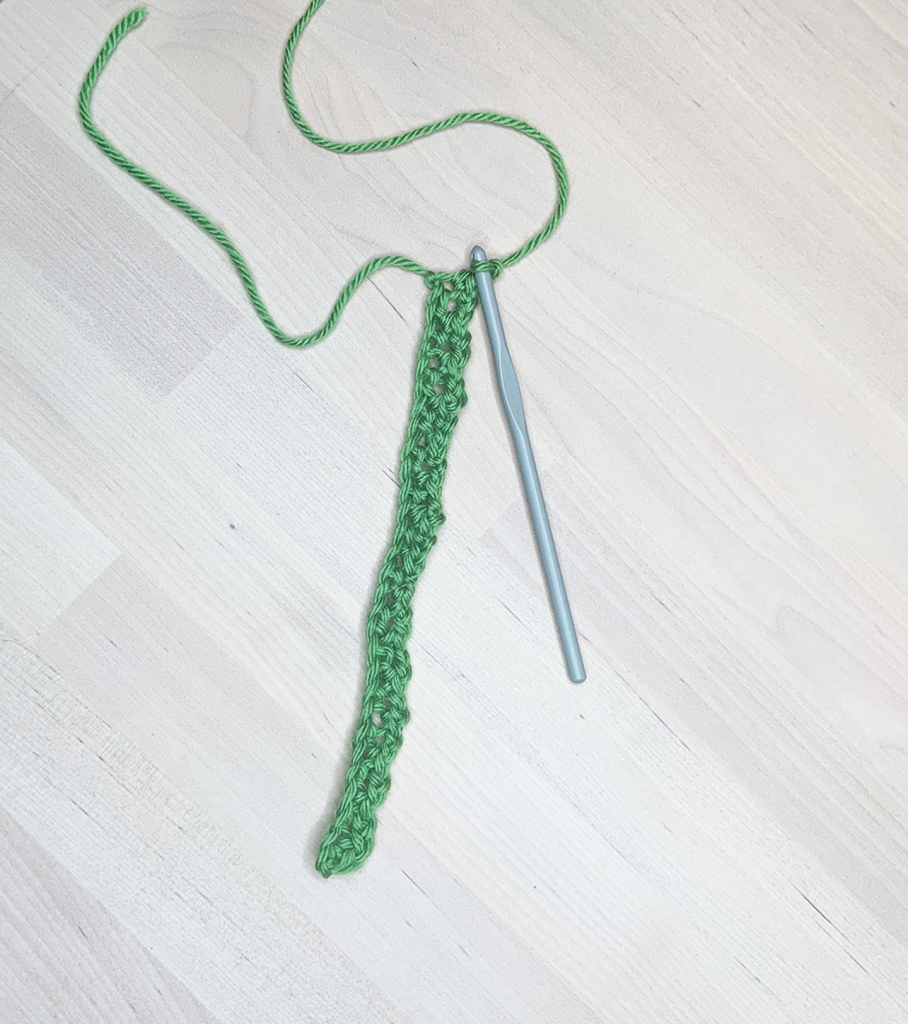
STEP ONE: Chain stitches
Chain on a number of stitches that is a multiple of 10 and add one extra stitch. In my experience, the succulents are more successful with 41 or 51 stitches, or larger. Depending on how large you want your succulent to be. Anything less than 41 and it gets hard to lay it out properly at the end.

STEP TWO: Single crochet
Now you will work in rows across your chain stitches. Make your first single crochet into the second chain stitch from the hook. (if you miscalculate, don’t worry you can start over). Then chain two stitches. Skip the next chain stitch and single crochet into the following chain stitch. (You will be single crocheting into every other chain stitch). Continue until you get to the end of your chain stitches. (If you started in the correct chain stitch your last single crochet will go into the last chain stitch.) Then chain two and turn your work over.
STEP THREE: Making your first set of petals
Double crochet (dc) into the first chain two (ch 2) space. That is the space that was made when you chained 2 in the previous row. This will not be going into a stitch, but rather the space. Make a second double crochet into this space. Chain 2 and make two more double crochets into this same space. So you will have 2 dc, 2ch, 2dc in one space. Finally, single crochet and then make a slip stitch in this same space.
WAIT! What’s a slip stitch? It’s easy. Just insert your hook into the space, grab the yarn and pull through the space and the stitch on your hook. This will just tighten up your petal.
You should have one petal complete.
Slip stitch into the next chain two space, chain one and then you are ready to start your next petal. So you will have used two of your chain two spaces with these stitches, then your pattern repeats.
Continue about 1/3 of the way down your yarn. We are going to change the size of our petals as we move down the your stitches, so leave some room.
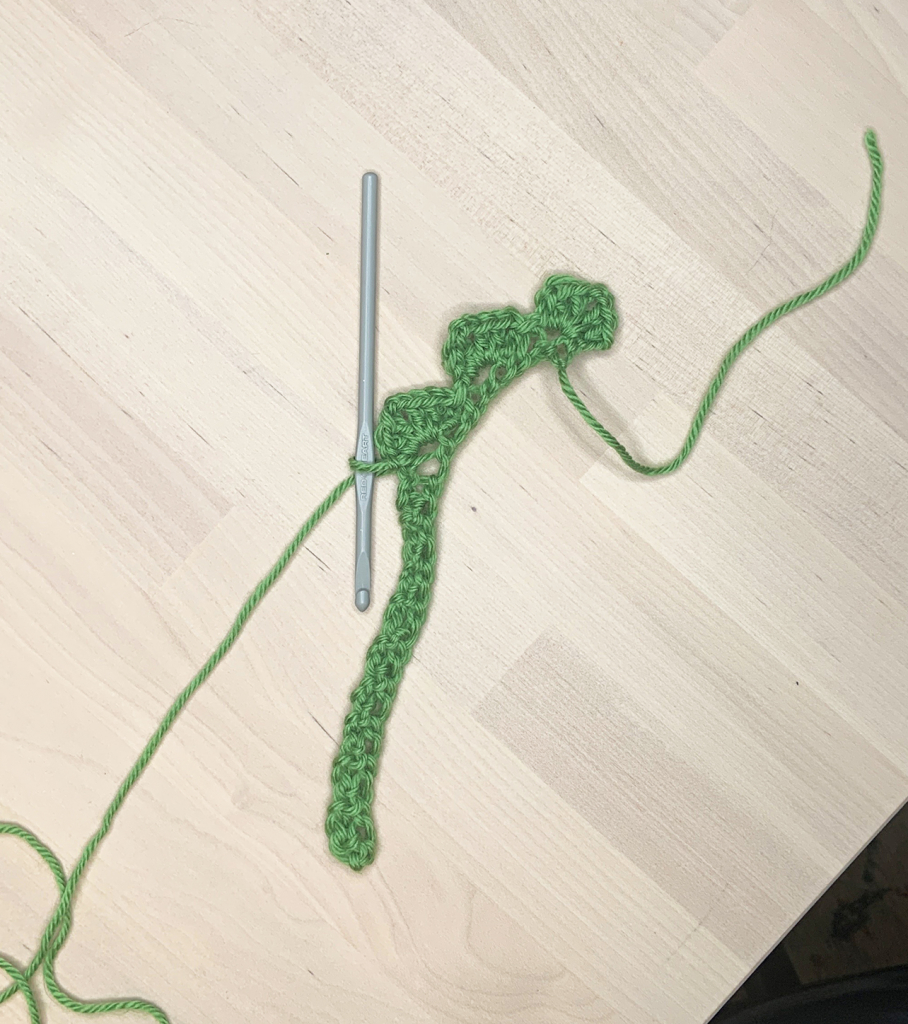
STEP FOUR: Making your second set of petals
Finishing the above with the slip stich and chain one, make a half double crochet (hdc) into the next chain space. You are going to do 2 hdc, ch 2, 2 hdc, ch 1, slip stitch (similar to above, but swapping out the dc with hdc). This will create smaller petals. Carry on into the next chain two space with the slip stitch and ch 1 before you start your next petal in the next ch2 space.
Continue with the hdc petals until you are another 1/3 of the way down your yarn. You should be 2/3 of the way through your stitches.

STEP FIVE: Making your final set of petals
Again, you will finish step four with your slip stitch and chain one, then you will move down to single crochets (sc). So in this ch 2 space, you will have 2 sc, ch 2, 2 sc, ch 1, slip stitch. See the pattern developing? Carry on until you reach the end of your row.

STEP SIX: Sewing it together
This step can be a bit tricky. Cut your yarn with about 20 inches of a tail. Then thread this tail on to your yarn needle. starting with the smallest petals wrap the base around and around until it is all coiled up making sure the base row (your original chain stitches) are all visible. Then sew through all of the stitches to secure them. Be sure to check out the video, as the visual really helps on this one.

Now you have a succulent to add to an indoor garden! (Along with your rock and your gnome!)
Here is what mine turned out like:


Leave a Reply